If you have a new Nexus 5x, it comes with factory locked bootloader. Unlocking the bootloader is pretty easy but it also means that it makes the phone very unsecured and makes your personal data more vulnerable. Its for you to decide whether you want to unlock the bootloader and flash custom ROMs or system images on your Nexus 5x.
If you decide to unlock your bootloader, remember that it will erase all your user data on the phone so backup your important data first. Let’s go through the steps to unlock the bootloader of Nexus 5x.

You’ll need a working adb/fastboot environment on your PC to get through some of the steps below. Google hosts ADB/Fastboot SDK (platform-tools) for Windows, OSX, and Linux. Download the necessary SDK Platform tools for your PC. For this tutorial, we’ll be using Windows so download the SDK Platform Tools for Windows. Also, Download the Google USB Drivers if necessary. Follow the steps after you’ve downloaded the necessary files.
How to Unlock Bootloader of Nexus 5x
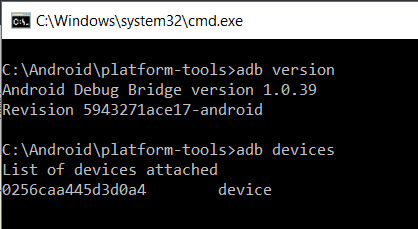
- First, make sure that adb is correctly installed on your PC. [Open a Command Prompt from your fastboot folder and issue the command “adb version”]
If it returns a version number for Android Debug Bridge then you’re good to go. - Connect your Nexus 5x to your PC while booted into Android and also make sure that USB debuggin is enabled in Developer Settings. with the Screen Unlocked. Issue this command “adb devices”. Make sure press OK when prompted to “Allow USB debugging” on your phone.

- Enable Developer Options by tapping on the “Build Number” in “About Phone” continuously until you see a toast notification telling you that you’ve enabled Developer Options. Tap on Developer Options, click on “OEM unlocking” which will allow the bootloader to be unlocked.

- Power off your phone and boot in the bootloader. [Hold power and volume down buttons]
- Connect your Nexus 5x to your PC via usb cable and Open the Command Prompt from your fastboot folder.
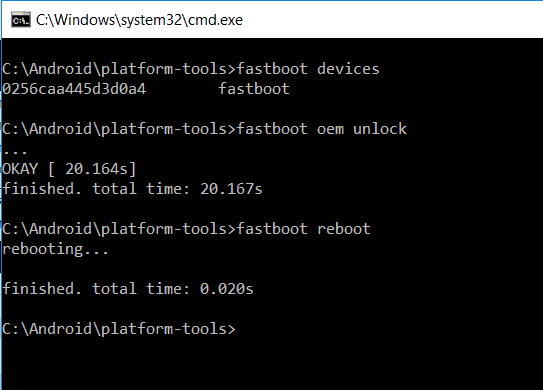
- Check whether the fastboot is working or not by issuing the command “fastboot devices” in the command prompt.
- Then type “fastboot oem unlock” in the command prompt to unlock the bootloader. [A new window should appear on your Nexus 5x telling you stuff about unlocking the bootloader. Use your volume keys to select the unlock bootloader option and press the power button to select.]
- Allow the process to complete and also, All your data will be erased from the device. Then type “fastboot reboot” to reboot your Nexus 5x.


That’s all for unlocking the bootloader of your Nexus 5x. To install a custom recovery on your 5x, follow the instructions below.
How to Install A Custom Recovery TWRP on Nexus 5x
- Download TWRP Recovery for Nexus 5x and place the file in your fastboot folder. [Rename “twrp-3.1.1-0-bullhead.img” to “twrp.img” in the folder.]
- Power off your phone and boot in the bootloader. [Hold power and volume down buttons]
- Open a command prompt from your fastboot folder and enter the command “fastboot flash recovery twrp.img”.

- After the process is completed, use the volume keys to select the “Restart Bootloader” option and power button to confirm it.
- Once the phone has been booted back into bootloader, use the volume keys to select “Recovery Mode” and power button to confirm it. You should boot into your newly installed TWRP Recovery. [When TWRP boots up, you’ll be asked whether you want to allow system modifications or to keep it read-only, choose to allow system modifications, there’s no benefit to keeping it read-only.]

That’s all for installing a TWRP Recovery on your Nexus 5x. To install Custom ROMs or System Images, follow the instructions below.
How to Flash Custom ROMs on Nexus 5x
Installing a ROM or system images or even a kernel is a very easy process. Always remember to create a nandroid backup before you install anything. You should install the required vendor.img that matches Google Security OTA that the ROM you want to install is based on. You can find ROMs, Kernels and Development Stuff at XDA-Developers for Nexus 5x.
- Download a ROM for Nexus 5x and GApps package. Put the files in your internal memory of your device.
- Boot into TWRP Custom Recovery. Press “Wipe” and Swipe to Factory Reset or “Advanced Wipe” then select “Dalvik/ART Cache”, “System”, “Data” and “Cache” and Swipe to Wipe.
- In the TWRP, Tap on Install then tap “Install Image” and select the vendor image and swipe to install.
- Again, Tap on Install then select the ROM and press ” Add more Zips” then select the Gapps package then Swipe confirm Flash.
- This will run an installer script that will flash the ROM and Gapps on the device. After it is completed, tap on “Wipe cache/dalvik” then “Reboot System”.
This will take you to your new ROM boot screen and Enter your details and follow the installer process to make the phone up and running.
If you have any comments about the topic above, please comment and we’ll be glad to help. That’s it on How to Unlock Bootloader, Install TWRP and Flash Custom ROMs on the Nexus 5x.